Showing posts with label ClodPi. Show all posts

Saturday, December 8, 2018

ClodPi LoRAWAN Indoor Gateway Integration with The Things Network (TTN)

0 comments


ClodPi Indoor Gateway Specification:

  • Frequency Band: IN865-867
  • RF Transceiver: Semtech SX LoRa radio module
  • Number of Channels: 8 concurrent channels
  • WiFi: 802.11 b/g/n 2.4GHz
  • WAN Port: One RJ-45 10/100Base-T/TX, Auto-sensing, Auto-MDIX
  • Transmit RF Power: 0.5W (up to 27 dBm)
  • Receive Sensitivity: Down to -142 dBm
  • Modulation: Based on LoRaWAN
  • USB Port: One USB 2.0 port
  • Power Supply: 5VDC/2A via mini-USB port
  • Antenna Type: Built-in Wi-Fi antenna and one (1) external SMA LoRa antenna
Step 1: Configuration with The Things Network (TTN)
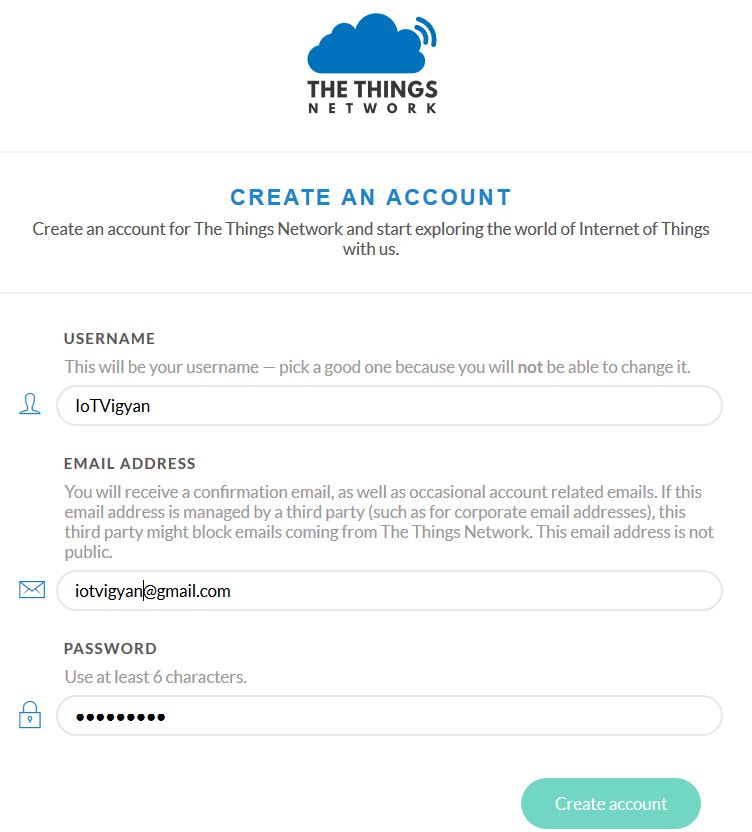
Set up your account with The Things Network
To set up your account with The Things Network, follow these steps:


  • After Login; Click Console.
  • Register your gateway: 
  • From the console screen, click Gateways. 


  •   Click register gateway


  • Obtain the gateway ID from the Clodpi Gateway Login.
Step 2:

  • Power On the Gateway and check for Power LED to Glow
  • Power On the Gateway will initiate the Wi-fi connection of the Gateway for configuration purposes.
  • Identify the Open Wifi connection – Start or end with AP
  • Connect to this Wifi connection , in this case it is AP-F3830
  • Once connected , open any browser and connect the Gateway configuration panel by accessing the IP address : 192.168.55.1


                                  Figure : Access Gateway with standard wifi access
Note: This wifi access is unsecured (with out password), so it is recommended to change or secure the wifi access using wifi encryption.

Step 3:


                                     Figure : Login to Gateway


  • Login to the gateway by given password. Username : admin, password : admin
  • Now go to Packet Forward ; Setting , get the Gateway ID shown in below figure
 

Figure : ClodPi Gateway ID 


Step 4:


  • Fill in the information to register the gateway as shown below.

Note :If the gateway is set to use “The Things Network Legacy” preset, be sure to check I’m using the legacy packet forwarder. Otherwise, the gateway can use the preset and the checkbox should be left unchecked 

  • Enter Gateway EUI , add 0000 prefix in Gateway Id to make it 8byte address
  • In case of ClodPi Indoor Gateway, we need to check the "I'm using the legacy packet forwarder"
  • Enter Description as you like
  • Select Frequency Plan as applicable to your region. In case of India it is "India 865-867 Mhz"


Figure: TTN Gateway Registration


  •  System will automatically Select Router "ttn-router-asia-se"
  • Select location on Map , Antenna Placement - Indoor or Outdoor and Register Gateway
Figure: Mark Gateway Location
  • Configure Server Address: router.as2.thethings.network
  • Server Uplink Port: 1700
  • Server Downlink Port: 1700
Note : You should point your gateway to one of the following addresses instead:
  • router.au.thethings.network (Australia, 915 MHz)
  • router.as1.thethings.network (Southeast Asia, 920-923 MHz - 'AS923' low)
  • router.as2.thethings.network (Southeast Asia, 923-925 MHz - 'AS923' high)
  • router.eu.thethings.network (Europe, 868 MHz)
  • router.us.thethings.network (America, 902-928 MHz)
  • router.kr.thethings.network (Korea, 920-923 MHz)

If you need more help with gateway setup, please see the TTN documentation here. Some gateways require special tweaks to their configuration files. If you are having difficulty with the setup, try searching the forums here for a solution.

Once your gateway is set up and turned on, you should be able to see any LoRaWAN traffic it sends or receives in the Data page for your gateway. It will however remain encrypted on this page.


Figure : Configure Server Address and Port for Clodpi IoT platform

Step 6:
Now check the gateway status in TTN Console under Gateway tab.


For more information, write us on iotvigyan@gmail.com.
ClodPi LoRAWAN Indoor Gateway Integration with The Things Network (TTN) is first time published on IoT Vigyan Blog
Read more...

Sunday, November 11, 2018

ClodPi LoRAWAN Indoor Gateway Integration with ClodPi IoT Portal

0 comments


                                                      Figure 1 : Clodpi Indoor Gateway
Specification
Frequency Band: IN865-867
RF Transceiver: Semtech SX LoRa radio module
Number of Channels: 8 concurrent channels
WiFi: 802.11 b/g/n 2.4GHz
WAN Port: One RJ-45 10/100Base-T/TX, Auto-sensing, Auto-MDIX
Transmit RF Power: 0.5W (up to 27 dBm)
Receive Sensitivity: Down to -142 dBm
Modulation: Based on LoRaWAN
USB Port: One USB 2.0 port
Power Supply: 5VDC/2A via mini-USB port
Antenna Type: Built-in Wi-Fi antenna and one (1) external SMA LoRa antenna

Step 1:
•    Power On the Gateway and check for Power LED to Glow
•    Power On the Gateway will initiate the Wi-fi connection of the Gateway for configuration purposes.
•    Identify the Open Wifi connection – Start or end with AP
•    Connect to this Wifi connection , in this case it is AP-F3830D
•    Once connected , open any browser and connect the Gateway configuration panel by accessing the IP address : 192.168.55.1

                                  Figure 2: Access Gateway with standard wifi access
Note: This wifi access is unsecured (with out password), so it is recommended to change or secure the wifi access using wifi encryption.

Step 2:

                                     Figure 3 : Login to Gateway

•    Login to the gateway by given password. Username : admin, password : admin
•    Now go to Packet Forward --> Setting
o    Configure Server Address: bridge.clodpi.io
o    Server Uplink Port: 1700
o    Server Downlink Port: 1700


                           Figure 4 : Configure Server Address and Port for Clodpi IoT platform

•    Copy the Gateway ID , this will require in Cloudpi IoT portal to add the Gateway

Step 3: Adding the Gateway to Clodpi IoT cloud console
•    Access site : https://console.clodpi.io/
•    Signup with your details – email address, password, Name & Organisation Name


                                        Figure 5
•    Login to the site after getting the account confirmation

                              Figure 6


•    Login screen


                            Figure 7
•    Add Gateway : Click left sidebar at Add New Gateway
•    This will take you to the following screen

 
                                         Figure 8

•    Enter Name as you like, Description about your gateway (may be location or project name and MAC Address
o    Kindly note that the mac address need to add “0000” prefix as the mac address given in Clodpi gateway is of only 12 digits but the requirement id of 16 digit .
o    So if your gateway mac is :abcdef123456 , then you need to enter 0000 abcdef123456 in the settings


                                                                   Figure 9

•    Now Check the live frames from Gateway
o    If the color of the dot is RED/MAROON ,means LoRAWAN gateway is still not communicating with Clodpi IoT platform
o    If the color of the dot is BLUE , means LoRAWAN gateway is communicating with Clodpi IoT platform


                                       Figure 10

•    Now check Live frames (wait for few seconds to get the Live data from gateway):


                                       Figure 11

For more information, write us on iotvigyan@gmail.com.
ClodPi Indoor Gateway Integration with ClodPi IoT Portal  is first time published on IoT Vigyan Blog.


Read more...

Tuesday, October 16, 2018

Unbox ClodPi LoRAWAN Gateway

0 comments
This article covers the high level details of ClodPi LoRaWAN Gateway and Unbox of the Gateway package.


Properties

  • Enclosure: All metal Enclosure, ready for industries
  • Power Supply: 5VDC/2A via mini-USB port
  • Antenna Type: External SMA LoRa antenna & Built-in Wi-Fi antenna
  • Frequency Band: IN865-867
  • RF Transceiver: SX1301 with SX1257
  • Number of Channels: 8 concurrent channels
  • WiFi: 802.11 b/g/n 2.4GHz
  • WAN Port: One RJ-45 10/100Base-T/TX, Auto-sensing, Auto-MDIX
  • Transmit RF Power: 0.5W (up to 27 dBm)
  • Receive Sensitivity: Down to -142 dBm
For more information about the product on www.clodpi.io
This article is first time published on www.IoTVigyan.com for more information ,kindly reach us at iotvigyan@gmailcom 

 
Read more...
Related Posts Plugin for WordPress, Blogger...
 
IoT Vigyan © 2011 Main Blogger - Blogger Template & Blogging Stuff. Supported by PsPrint Emeryville and homeinbayarea.com