Tuesday, February 19, 2019

Teralytic || LoRAWAN Based Smart Farming

1 comments


Main Issue : Lack of soil data during growing season lowers yields and profits, and harms the environment. 


Farmers don’t have real-time visibility into soil conditions as they’re working their fields. Without that visibility, farmers often over-or under-fertilize, harming profits and/or the environment.
Traditional soil samples and lab techniques take days to weeks to get results back, are expensive to obtain, and as a result, problems manifest in the plant before results are returned.
 

 Solution:Teralytics

Get the most detailed soil quality data available, via a single probe with 26 sensors reporting soil moisture, salinity, and NPK at three different depths, as well as aeration, respiration, air temperature, light, and humidity.

No wires. Nothing to catch or snag. Easy to install and built to stand up to the wear and tear of your farm.


Key Features:
1. These probes collect data from your soils and send wirelessly via LoRaWAN, a long-distance network that transmits sensor data up to 10 miles away.

2. Wireless LoRaWAN gateways aggregate all probe data and send it to the cloud in a secure, continuous, live stream.

3. In cloud, we run analytics on your data based on soil conditions compiled by governments, universities, and the unique criteria from your farm.

4. Report back to you with real-time and predictive insights using readable charts - and you use the insight on your farm.

5.Send Sensor data to Teralytic Cloud via Cellular, WiFi, or Ethernet

Measure Soil electrical conductivity, moisture, pH, Nitrates, Phosphates, Potassium, and temperature at 3 different depths. Sample every 15 minutes

  • Microclimate (Surface) :Air Temperature, Humidity, Light
  • Soil Sensors : Soil Moisture, Salinity, Soil Temperature, pH, Nitrate, Potassium, Phosphorus
  • Gas Sensors 18in / 6in Depths: Aeration (O2), Respiration (CO2)


Sensor Arrays Available for 3 Depths


6, 18 and 36 inches / 15, 45, and 90 cm give a stratified view of soils


 Analytics:

Terascore is best-in-class metric that analyzes hundreds of data points from your farm and industry statistics to summarize what you need to know about your soil health.

Terascore is crop- and soil-type specific, so it is customized based on the unique profile of your farm.


If you prefer a more detailed breakdown - thye have that too.

Easily track how inputs affect your soil conditions and view historic averages reported for each sensor, at each depth.


Pricing :

As per website, they are sold out of Teralytic probes for Spring 2019 shipment–all new pre-orders will receive shipments in Fall 2019.


Teralytic SAAS-Based Business Model

Soil Sensors as a Service: Teralytic charges up front per sensor plus a yearly subscription 
SaaS-based model includes sensors, networking, software and analytics
Crop-based pricing: Crop type determines sensor density between 575 acres, which determines price
Streamlined Onboarding and Ordering: Online tool during onboarding helps with sensor placement and pricing 


For more information reach: https://teralytic.com/index.html
This article Teralytic || LoRAWAN Based Smart Farming is first time published on IoTVigyan , for any query or suggestion, feel free to reach on iotvigyan@gmail.com.
Reference : Internet
 
Read more...

Sunday, January 6, 2019

Sensoterra | Revolutionary Precision Farming using LoRAWAN

1 comments


Only 3% of the world’s water is accessible freshwater. Of that, 70% of the freshwater consumed is used in the agricultural industry – the largest consumer of water globally. Monitoring soil moisture levels helps farmers to make effective and smart irrigation decisions. Too much water in the soil leads to waterlogged areas and anpotential for plant illness or death, while too little water will harm crop growth.

Here is the Solution !!

Sensoterra: more crop per drop. Making it easy and affordable to measure soil moisture and produce more food for less. 

Our climate is changing; freshwater supplies are dwindling and droughts, flash floods and failed crops are more and more common. This makes our global food production unstable while our population continues to grow.

Agriculture consumes 70% of the world’s water supply to provide food for 7.5 billion people, yet agriculture is far behind when it comes to embracing digital solutions to solve problems of efficiency and quality in the production of food. Less than 1% of all farmers use sensors to understand their crops condition and needs. As a result, almost all farmers over-irrigate their crops by up to 60%, wasting money, precious water and damaging healthy soils.  

That’s where Sensoterra soil moisture measurement system comes in picture. A low cost and user-friendly tool for farmers that will make the agriculture sector more sustainable and efficient. The Sensoterra Multi Depth Probe will lower water use and increase yields in the agriculture sector, bringing agriculture professionals extensive insight into soil condition. 

The Sensoterra mission is to tackle water waste in agriculture and help farmers increase yield and decrease costs. In short; producing more food for less.

Sensoterra is a low-cost, wireless and remote system that offers farmers real-time insight into the soil moisture condition of their crops. Soil is not homogenous – it holds moisture differently in various areas. With low-cost, plug and play probes that can be deployed across a large field in more areas, the
data becomes more valuable and results in smarter irrigation decisions. 
How it Works ?
  

The step-by-step process of Sensoterra’s LoRa-enabled solution

 The company utilizes Semtech LoRa-enabled sensors in its probes and a LoRaWAN™ network that enables the IoT connectivity, Sensoterra primarily focused on the North America and European agriculture markets and has deployed over 4,000 sensors and achieved over 720,000 data points since the product launch in 2016. Sensoterra’s solutions are now being deployed in Australia, South America and other parts of the world. In Dec 2018, IoTVigyan enquired and found that right now Sensoterra's probe do not support Indian LoRAWAN frequency, but if there is attractive business case from India, they can think about the same.

 Current Projects of Sensoterra

USP of Sensoterra

Ease of installation is a key feature of Sensoterra’s soil moisture system. LoRa-enabled multi-depth probe sensors can be installed in a matter of minutes and data is viewable online within an
hour after installation. A free app is available for download and can operate on a laptop, tablet or mobile phone. Users have the ability to manage their installations through an easy to use dashboard and an open API is available for data integration.


Technical Details

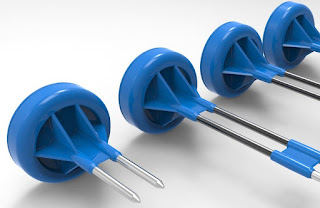
Sensoterra probe


  • Economic pricing
  • Two-minute installation 
  • Fully wireless and remote 
  • Lifetime of 3-10 years 
  • Compatible with all soil types 
  • Free Data 
  • Wireless range up to 4 km 
  • Measure at different soil depths
  • Probes retail at USD 110 


The system consists of probes, a solar-powered gateway and the stand-alone cloud-system “SoilWare”. Varying probe lengths (15, 30, 60 and 90 centimeters), allow measurement at different soil depths directly at the root of the plant.

Soil moisture data is sent to the cloud through the gateway, the user can access soil moisture data from any location and at any time.

The Sensoterra SoilWare system provides the farmer insight in real-time soil moisture percentage data per measurement point, per crop and stores all data securely stored in the cloud.  Farmers can compare soil moisture distribution per day, week or even year and access all data through PC, smartphone or tablet.


 How Sensoterra can be market differentiator ?

The soil moisture sensor market is dated and prices are high, ranging between 500-1,000 USD per sensor. As a result, typically only 1 sensor is used in a field covering as much as 50 hectares. Using only 1 data point is a high risk for irrigation management, especially considering differences in soil and crop type.

Boasting completely wireless sensors with the most intuitive UX and user friendly design, our sensors are offered at a fraction of the costs of competition, averaging 110 USD per sensor.

Besides the significantly lower retail price for Sensoterra, virtually every competitor is using a subscription model for data use. Sensoterra provides data for free, and charges no fees for the app or any other hidden cost.

For more information reach:https://www.sensoterra.com/

This article Sensoterra | Revolutionary Precision Farming using LoRAWAN is first time published on IoTVigyan , for any query or suggestion, feel free to reach on iotvigyan@gmail.com.

Reference : Internet


Read more...

Saturday, December 8, 2018

ClodPi LoRAWAN Indoor Gateway Integration with The Things Network (TTN)

0 comments


ClodPi Indoor Gateway Specification:

  • Frequency Band: IN865-867
  • RF Transceiver: Semtech SX LoRa radio module
  • Number of Channels: 8 concurrent channels
  • WiFi: 802.11 b/g/n 2.4GHz
  • WAN Port: One RJ-45 10/100Base-T/TX, Auto-sensing, Auto-MDIX
  • Transmit RF Power: 0.5W (up to 27 dBm)
  • Receive Sensitivity: Down to -142 dBm
  • Modulation: Based on LoRaWAN
  • USB Port: One USB 2.0 port
  • Power Supply: 5VDC/2A via mini-USB port
  • Antenna Type: Built-in Wi-Fi antenna and one (1) external SMA LoRa antenna
Step 1: Configuration with The Things Network (TTN)
Set up your account with The Things Network
To set up your account with The Things Network, follow these steps:


  • After Login; Click Console.
  • Register your gateway: 
  • From the console screen, click Gateways. 


  •   Click register gateway


  • Obtain the gateway ID from the Clodpi Gateway Login.
Step 2:

  • Power On the Gateway and check for Power LED to Glow
  • Power On the Gateway will initiate the Wi-fi connection of the Gateway for configuration purposes.
  • Identify the Open Wifi connection – Start or end with AP
  • Connect to this Wifi connection , in this case it is AP-F3830
  • Once connected , open any browser and connect the Gateway configuration panel by accessing the IP address : 192.168.55.1


                                  Figure : Access Gateway with standard wifi access
Note: This wifi access is unsecured (with out password), so it is recommended to change or secure the wifi access using wifi encryption.

Step 3:


                                     Figure : Login to Gateway


  • Login to the gateway by given password. Username : admin, password : admin
  • Now go to Packet Forward ; Setting , get the Gateway ID shown in below figure
 

Figure : ClodPi Gateway ID 


Step 4:


  • Fill in the information to register the gateway as shown below.

Note :If the gateway is set to use “The Things Network Legacy” preset, be sure to check I’m using the legacy packet forwarder. Otherwise, the gateway can use the preset and the checkbox should be left unchecked 

  • Enter Gateway EUI , add 0000 prefix in Gateway Id to make it 8byte address
  • In case of ClodPi Indoor Gateway, we need to check the "I'm using the legacy packet forwarder"
  • Enter Description as you like
  • Select Frequency Plan as applicable to your region. In case of India it is "India 865-867 Mhz"


Figure: TTN Gateway Registration


  •  System will automatically Select Router "ttn-router-asia-se"
  • Select location on Map , Antenna Placement - Indoor or Outdoor and Register Gateway
Figure: Mark Gateway Location
  • Configure Server Address: router.as2.thethings.network
  • Server Uplink Port: 1700
  • Server Downlink Port: 1700
Note : You should point your gateway to one of the following addresses instead:
  • router.au.thethings.network (Australia, 915 MHz)
  • router.as1.thethings.network (Southeast Asia, 920-923 MHz - 'AS923' low)
  • router.as2.thethings.network (Southeast Asia, 923-925 MHz - 'AS923' high)
  • router.eu.thethings.network (Europe, 868 MHz)
  • router.us.thethings.network (America, 902-928 MHz)
  • router.kr.thethings.network (Korea, 920-923 MHz)

If you need more help with gateway setup, please see the TTN documentation here. Some gateways require special tweaks to their configuration files. If you are having difficulty with the setup, try searching the forums here for a solution.

Once your gateway is set up and turned on, you should be able to see any LoRaWAN traffic it sends or receives in the Data page for your gateway. It will however remain encrypted on this page.


Figure : Configure Server Address and Port for Clodpi IoT platform

Step 6:
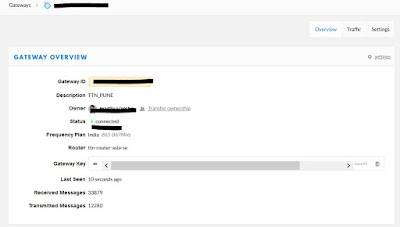
Now check the gateway status in TTN Console under Gateway tab.


For more information, write us on iotvigyan@gmail.com.
ClodPi LoRAWAN Indoor Gateway Integration with The Things Network (TTN) is first time published on IoT Vigyan Blog
Read more...

Sunday, November 11, 2018

ClodPi LoRAWAN Indoor Gateway Integration with ClodPi IoT Portal

0 comments


                                                      Figure 1 : Clodpi Indoor Gateway
Specification
Frequency Band: IN865-867
RF Transceiver: Semtech SX LoRa radio module
Number of Channels: 8 concurrent channels
WiFi: 802.11 b/g/n 2.4GHz
WAN Port: One RJ-45 10/100Base-T/TX, Auto-sensing, Auto-MDIX
Transmit RF Power: 0.5W (up to 27 dBm)
Receive Sensitivity: Down to -142 dBm
Modulation: Based on LoRaWAN
USB Port: One USB 2.0 port
Power Supply: 5VDC/2A via mini-USB port
Antenna Type: Built-in Wi-Fi antenna and one (1) external SMA LoRa antenna

Step 1:
•    Power On the Gateway and check for Power LED to Glow
•    Power On the Gateway will initiate the Wi-fi connection of the Gateway for configuration purposes.
•    Identify the Open Wifi connection – Start or end with AP
•    Connect to this Wifi connection , in this case it is AP-F3830D
•    Once connected , open any browser and connect the Gateway configuration panel by accessing the IP address : 192.168.55.1

                                  Figure 2: Access Gateway with standard wifi access
Note: This wifi access is unsecured (with out password), so it is recommended to change or secure the wifi access using wifi encryption.

Step 2:

                                     Figure 3 : Login to Gateway

•    Login to the gateway by given password. Username : admin, password : admin
•    Now go to Packet Forward --> Setting
o    Configure Server Address: bridge.clodpi.io
o    Server Uplink Port: 1700
o    Server Downlink Port: 1700


                           Figure 4 : Configure Server Address and Port for Clodpi IoT platform

•    Copy the Gateway ID , this will require in Cloudpi IoT portal to add the Gateway

Step 3: Adding the Gateway to Clodpi IoT cloud console
•    Access site : https://console.clodpi.io/
•    Signup with your details – email address, password, Name & Organisation Name


                                        Figure 5
•    Login to the site after getting the account confirmation

                              Figure 6


•    Login screen


                            Figure 7
•    Add Gateway : Click left sidebar at Add New Gateway
•    This will take you to the following screen

 
                                         Figure 8

•    Enter Name as you like, Description about your gateway (may be location or project name and MAC Address
o    Kindly note that the mac address need to add “0000” prefix as the mac address given in Clodpi gateway is of only 12 digits but the requirement id of 16 digit .
o    So if your gateway mac is :abcdef123456 , then you need to enter 0000 abcdef123456 in the settings


                                                                   Figure 9

•    Now Check the live frames from Gateway
o    If the color of the dot is RED/MAROON ,means LoRAWAN gateway is still not communicating with Clodpi IoT platform
o    If the color of the dot is BLUE , means LoRAWAN gateway is communicating with Clodpi IoT platform


                                       Figure 10

•    Now check Live frames (wait for few seconds to get the Live data from gateway):


                                       Figure 11

For more information, write us on iotvigyan@gmail.com.
ClodPi Indoor Gateway Integration with ClodPi IoT Portal  is first time published on IoT Vigyan Blog.


Read more...
Related Posts Plugin for WordPress, Blogger...
 
IoT Vigyan © 2011 Main Blogger - Blogger Template & Blogging Stuff. Supported by PsPrint Emeryville and homeinbayarea.com